分类 默认分类 下的文章

接手别人的几个项目,项目管理在gerrit上,由于中途经过多次转手,管理员帐号已经丢失。

服务器在手,但大家都只能得到普通用户权限。

因此目标是拿到Administrators群组的权限,即,将一个帐号加入此群组。

基本信息:

Gerrit版本:2.16.7

Gerrit认证方式:LDAP

Gerrit数据库存储方式:H2

Gerrit安装在:/data/gerrit/gerrit_app

Gerrit仓库位于:/data/gerrit/gerrit_app/git/repositories

前期走了很多弯路,因为网络上的资料大多是2.4版本,都是指导让登陆gsql,在数据库中去操作。

停掉Gerrit服务后,手工登陆进gsql,完全找不到要操作的诸如accounts、account_group_by_id等表。来回折腾很久还是搞不定。

最近随着Gerrit了解的深入,看到Gerrit的版本日志提到,2.15版本将account表已经转为NoteDB,2.16版本将group表转为NoteDB。

这才恍然大悟,转向搜索gerrit notedb的资料搜索。

找到如下网页信息参考:

https://blog.nanpuyue.com/2018/044.html

虽然上文,操作的是迁移登陆插件,但其基本原因是大致相同的。

最终一顿操作猛如虎,终究搞定这个难题。

原理大致是,NoteDB实际在后台会是一个Git仓库,直接从Git仓库中Clone出数据来,然后修改相应Groups下的信息,提交上去,就OK了。

在Gerrit文档中/Documentation/config-groups.html有groups的一些操作说明。

如下命令均是在Gerrit服务器上直接执行的。

第0步,停止gerrit服务

/data/gerrit/gerrit_app/bin/gerrit.sh stop

第一步,克隆出All-Users仓库

git clone /data/gerrit/gerrit_app/git/repositories/All-Users.git

这儿的克隆命令实际为从裸仓库克隆出一个工作仓库出来。

第二步,从All-Users/groups中得到Administrators群组的UUID


 第三步,修改当前工作仓库的指向

cd All-Users
git fetch origin refs
/groups/f4/f417bd0437a0e6f7e08885d07626b0698b4ecec2:refs/groups/f4/f417bd0437a0e6f7e08885d07626b0698b4ecec2

如果当前工作仓库是由root用户创建,则git命令前,应添加sudo

第四步,取出当前指向的内容。

git checkout refs/groups/f4/f417bd0437a0e6f7e08885d07626b0698b4ecec2

此时,All-Users取得就是gerrit文档中所说的groups的信息(即Administrators群组下的信息)


 可以看到,没有subgroups,而members信息即为我们要修改的文件。

vim打开后,将一个新用户的id插入在末尾(此ID通常是10000打头)。

修改好后,保存,准备提交。

第五步,add并commit

git add .
git commit
-m"xxxx"

第六步,更新引用

git update-ref refs/groups/f4/f417bd0437a0e6f7e08885d07626b0698b4ecec2 $(git rev-parse HEAD)

第七步,推上修改至仓库

git push origin refs/groups/f4/f417bd0437a0e6f7e08885d07626b0698b4ecec2

至此,重新启动Gerrit服务,新用户就添加进了Administrators群组了。

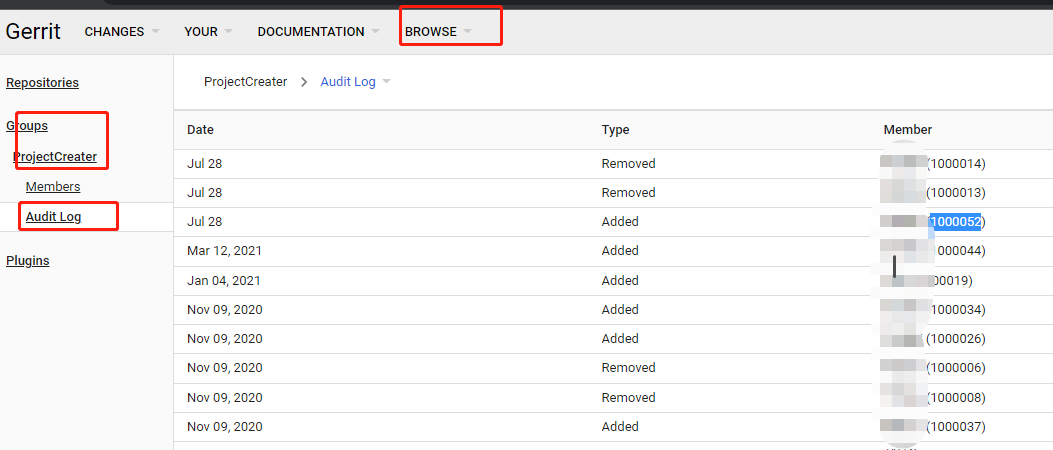
PS,用户ID的信息取得。

首先用户应是Gerrit中已注册的一个用户,在用户的Groups页面,任一群组里打开相应的Audit Log,即可看到相应用户的Id

比如:


链接地址:

http://comrade.ownz.com/docs/regions.html

FAQ: Window Regions

I have tried to collect a lot of information on window regions and resources on them. If you think I should add something more, e-mail me.

What are window regions?

Window regions allow you to create non-square Windows. The "regions" themselves are represented as objects (HRGN), and can be assigned to a particular window (HWND) using the SetWindowRgn API.
The official documentation for regions can be found on MSDN site here: http://msdn.microsoft.com/library/en-us/gdi/regions_7ab7.asp.

How do I create a region?

You can use the following API to create a window region:

  • CreateEllipticRgn
  • CreateEllipticRgnIndirect
  • CreatePolygonRgn
  • CreatePolyPolgyonRgn
  • CreateRectRgn
  • CreateRectRgnIndirect
  • CreateRoundRectRgn
  • ExtCreateRegion

For exact information on the functions, see the official documentation.


How do I create more complex regions?

To create complex regions, you can combine two regions using the CombineRgn function. The function allows you to take 2 regions, and combine them in various ways to produce a 3rd region (the destination region). For the list of possible combinations, see the official documentation.

How do I create regions out of images?

Creating a region out of an image means to create a window whose shape exactly matches the outline of a particular image. The image contains a region that is defined as transparency - meaning the window that shows that image should be transparent in those parts. To create such region manually, you can program a simple loop to subtract the transparent pixels from an initially rectangular region:

HRGN hRegion = CreateRectRgn(0, 0, width_of_image, height_of_image);

for (int y = 0; y < height_of_image; y++) {
for (int x = 0; x < width_of_image; x++) {
if (image is transparent at (x, y)) {
// create a dummy region for destination (it will be overwritten later anyway)
HRGN hRegionDest = CreateRectRgn(0, 0, 1, 1);
// create the region that represents the transparent pixel we want to subtract
HRGN hRegionPixel = CreateRectRgn(x, y, x+1, y+1);
// subtract the pixel from our current region, and save the new region into hRegionDest
// essentially: hRegionDest = hRegion - hRegionPixel
CombineRgn(hRegionDest, hRegion, hRegionPixel, RGN_XOR);
// delete the old region, and substitute with the new destination region
DeleteObject(hRegion);
hRegion = hRegionDest;
}
}
}

// at this point, we have the region in hRegion, and we can assign it to a window using SetWindowRgn

The above algorithm is very slow, particularly for very large images. However, you can run it once, save the region data, and then restore it later. Check the Anything extra? category for optimizations to the algorithm.

How do I save/restore regions?

To save a region, retrieve its internal composition using the GetRegionData API. Save the binary data into a file, or some other location you like:

// we are given a region hRegion to save
DWORD dwRegionSize = GetRegionData(hRegion, 0, NULL);
LPRGNDATA lpRgnData = (LPRGNDATA) malloc(dwRegionSize);
GetRegionData(hRegion, dwRegionSize, lpRgnData);
// save lpRgnData into a file or somewhere else

To restore a region from a saved location, use the ExtCreateRegion API (set lpXform to NULL, nCount to the size of the saved buffer in bytes, and lpRgnData to the pointer to the saved buffer):

// we are given a pointer to the region buffer lpRgnData, and its size in dwRegionSize
HRGN hRegion = ExtCreateRegion(NULL, dwRegionSize, lpRgnData);

So as you can see, GetRegionData and ExtCreateRegion are complements of each other - the former is used to convert a region into a binary data, and the latter to do the reverse.


How do I create transparent/translucent windows?

You want the SetLayeredWindowAttributes API.

In-depth tutorials?

Yes, there is plenty of stuff online. I noted some interesting ones, and here they are in no particular order:


Are there any tools/libraries to pre-create regions from images?

Yes, there are plenty. I have collected some links from the web over the years:

QvasiModo's MakeRegion

This is an excellent tool which I only find out about recently. The operation is pretty much self-explanatory: start MakeRegion.exe, go to Image -> Load, and pick an image. After that, choose what colour will be defined as the transparent colour. You can do so either by pointing to it in an image using the Image -> Pick transparent color tool, or by entering its explicit RGB value by going to Image -> Enter trans. color RGB. The program will then build the region data. You can save it by going to File -> Save As. It will offer you to save it as a .rgn file. In your own program, you can load this .rgn file straight in as binary data, and pass it through ExtCreateRegion API to get an hRegion out of it.
The tool even allows you to set tolerance levels, meaning it will except transparency colours that are not exactly what you picked, but are within a certain range. As well, the tool allows you to check the actual region composition as an array of rectangles.
It was first mentioned on the asmcommunity forums here. The attachment is mirrored here. The author is QvasiModo.

OnlyTools EdgeTracer

This is a commercial tool I found on Google. You can read more about it here. The screenshot looks nice - but the program costs $29.

The RGN Generator

A simple tool that lets you pick an image, enter the transparency colour and generate region data out of it. You can read it about it here, or download the mirrored version here.

comrade's Region Cutter

This is a small tool which I wrote many years ago to complement my tutorial on window regions. It is very simply: you pick a bitmap file, the destination region file, the transparency colour, and hit the Generate button.
You can download it here.

CContourBitmap Class

This is a C++ class for creating regions from bitmaps. It works by subtracting transparent pixels from a rectangular region. I have never tried it, but the author's name is Wolfgang, and you know that Mozart was one smart bloke.

CRegionCreater

This is a simple C++ class that implements a single function from converting a bitmap handle to a region.

CreateRegionFromFile

This is a function for converting a bitmap handle to a region, given some transparency colour.


Anything extra?

  • f0dder's customshape sources - a hacker named f0dder took the time to optimize the region creation routine. The results are impressive: 20ms versus 871ms for the old algorithm (as described above).
  • Useful functions for Regions - the dude made a CreateTileRegion and CreateStretchRegions functions, for tiling and stretching regions, respectively.
  • Custom light-weight Regions - the guy didn't like the regular window region API, so he made C++ wrappers around it.
  • Shapes and Regions (.NET) - some example for creating and testing regions in C# (.NET).
  • Irregular shaped buttons - an example on how to combine regions and owner-drawning of buttons to create some crazy buttons. Pretty cool.

//
//BitmapToRegion : Create a region from the "non-transparent" pixels of a bitmap//
//hBmp : Source bitmap//cTransparentColor : Color base for the "transparent" pixels (default is black)//cTolerance : Color tolerance for the "transparent" pixels.//
//A pixel is assumed to be transparent if the value of each of its 3 components (blue, green and red) is//greater or equal to the corresponding value in cTransparentColor and is lower or equal to the//corresponding value in cTransparentColor + cTolerance.//HRGN BitmapToRegion (HBITMAP hBmp, COLORREF cTransparentColor = 0, COLORREF cTolerance = 0x101010)
{
HRGN hRgn
=NULL;

ASSERT(hBmp);
if(hBmp)
{
//Create a memory DC inside which we will scan the bitmap content HDC hMemDC =CreateCompatibleDC(NULL);
ASSERT(hMemDC);
if(hMemDC)
{
//Get bitmap size BITMAP bm;
GetObject(hBmp,
sizeof(bm), &bm);//Create a 32 bits depth bitmap and select it into the memory DC BITMAPINFOHEADER RGB32BITSBITMAPINFO ={sizeof(BITMAPINFOHEADER), //biSize bm.bmWidth, //biWidth; bm.bmHeight, //biHeight; 1, //biPlanes; 32, //biBitCount BI_RGB, //biCompression; 0, //biSizeImage; 0, //biXPelsPerMeter; 0, //biYPelsPerMeter; 0, //biClrUsed; 0 //biClrImportant; };
VOID
*pbits32;
HBITMAP hbm32
= CreateDIBSection(hMemDC, (BITMAPINFO *)&RGB32BITSBITMAPINFO, DIB_RGB_COLORS, &pbits32, NULL, 0);
ASSERT(hbm32);
if(hbm32)
{
HBITMAP holdBmp
=(HBITMAP)SelectObject(hMemDC, hbm32);//Create a DC just to copy the bitmap into the memory DC HDC hDC =CreateCompatibleDC(hMemDC);
ASSERT(hDC);
if(hDC)
{
//Get how many bytes per row we have for the bitmap bits (rounded up to 32 bits) BITMAP bm32;
VERIFY(GetObject(hbm32,
sizeof(bm32), &bm32));while (bm32.bmWidthBytes % 4)
bm32.bmWidthBytes
++;//Copy the bitmap into the memory DC HBITMAP holdBmp =(HBITMAP)SelectObject(hDC, hBmp);
VERIFY(BitBlt(hMemDC,
0, 0, bm.bmWidth, bm.bmHeight, hDC, 0, 0, SRCCOPY));//For better performances, we will use the ExtCreateRegion() function to create the//region. This function take a RGNDATA structure on entry. We will add rectangles by//amount of ALLOC_UNIT number in this structure. #define ALLOC_UNIT 100DWORD maxRects=ALLOC_UNIT;
HANDLE hData
= GlobalAlloc(GMEM_MOVEABLE, sizeof(RGNDATAHEADER) + (sizeof(RECT) *maxRects));
RGNDATA
*pData = (RGNDATA *)GlobalLock(hData);
pData
->rdh.dwSize = sizeof(RGNDATAHEADER);
pData
->rdh.iType =RDH_RECTANGLES;
pData
->rdh.nCount = pData->rdh.nRgnSize = 0;
SetRect(
&pData->rdh.rcBound, MAXLONG, MAXLONG, 0, 0);//Keep on hand highest and lowest values for the "transparent" pixels BYTE lr =GetRValue(cTransparentColor);
BYTE lg
=GetGValue(cTransparentColor);
BYTE lb
=GetBValue(cTransparentColor);
BYTE hr
= min(0xff, lr +GetRValue(cTolerance));
BYTE hg
= min(0xff, lg +GetGValue(cTolerance));
BYTE hb
= min(0xff, lb +GetBValue(cTolerance));//Scan each bitmap row from bottom to top (the bitmap is inverted vertically) BYTE *p32 = (BYTE *)bm32.bmBits + (bm32.bmHeight - 1) *bm32.bmWidthBytes;for (int y = 0; y < bm.bmHeight; y++)
{
//Scan each bitmap pixel from left to right for (int x = 0; x < bm.bmWidth; x++)
{
//Search for a continuous range of "non transparent pixels" int x0 =x;
LONG
*p = (LONG *)p32 +x;while (x <bm.bmWidth)
{
BYTE b
= GetRValue(*p);if (b >= lr && b <=hr)
{
b
= GetGValue(*p);if (b >= lg && b <=hg)
{
b
= GetBValue(*p);if (b >= lb && b <=hb)//This pixel is "transparent" break;
}
}
p
++;
x
++;
}
if (x >x0)
{
//Add the pixels (x0, y) to (x, y+1) as a new rectangle in the region if (pData->rdh.nCount >=maxRects)
{
GlobalUnlock(hData);
maxRects
+=ALLOC_UNIT;
VERIFY(hData
= GlobalReAlloc(hData, sizeof(RGNDATAHEADER) + (sizeof(RECT) *maxRects), GMEM_MOVEABLE));
pData
= (RGNDATA *)GlobalLock(hData);
ASSERT(pData);
}
RECT
*pr = (RECT *)&pData->Buffer;
SetRect(
&pr[pData->rdh.nCount], x0, y, x, y+1);if (x0 < pData->rdh.rcBound.left)
pData
->rdh.rcBound.left =x0;if (y < pData->rdh.rcBound.top)
pData
->rdh.rcBound.top =y;if (x > pData->rdh.rcBound.right)
pData
->rdh.rcBound.right =x;if (y+1 > pData->rdh.rcBound.bottom)
pData
->rdh.rcBound.bottom = y+1;
pData
->rdh.nCount++;//On Windows98, ExtCreateRegion() may fail if the number of rectangles is too//large (ie: > 4000). Therefore, we have to create the region by multiple steps. if (pData->rdh.nCount == 2000)
{
HRGN h
= ExtCreateRegion(NULL, sizeof(RGNDATAHEADER) + (sizeof(RECT) *maxRects), pData);
ASSERT(h);
if(hRgn)
{
CombineRgn(hRgn, hRgn, h, RGN_OR);
DeleteObject(h);
}
elsehRgn=h;
pData
->rdh.nCount = 0;
SetRect(
&pData->rdh.rcBound, MAXLONG, MAXLONG, 0, 0);
}
}
}
//Go to next row (remember, the bitmap is inverted vertically) p32 -=bm32.bmWidthBytes;
}
//Create or extend the region with the remaining rectangles HRGN h = ExtCreateRegion(NULL, sizeof(RGNDATAHEADER) + (sizeof(RECT) *maxRects), pData);
ASSERT(h);
if(hRgn)
{
CombineRgn(hRgn, hRgn, h, RGN_OR);
DeleteObject(h);
}
elsehRgn=h;//Clean up,这儿需要再调用一下GlobalFree,否则有内存泄漏 SelectObject(hDC, holdBmp);
DeleteDC(hDC);
}

DeleteObject(SelectObject(hMemDC, holdBmp));
}

DeleteDC(hMemDC);
}
}
returnhRgn;
}

相应工程的示例代码: 

bmp2rgnfix.zip


另有Delphi版本的BitmapToRegion

function BitmapToRegion(bmp: TBitmap; TransparentColor: TColor =clBlack;
RedTol: Byte
= 1; GreenTol: Byte = 1; BlueTol: Byte = 1): HRGN;constAllocUnit= 100;typePRectArray=^TRectArray;
TRectArray
= array[0..(MaxInt div SizeOf(TRect)) - 1] ofTRect;varpr: PRectArray;//used to access the rects array of RgnData by index h: HRGN; //Handles to regions RgnData: PRgnData; //Pointer to structure RGNDATA used to create regions lr, lg, lb, hr, hg, hb: Byte; //values for lowest and hightest trans. colors x, y, x0: Integer; //coordinates of current rect of visible pixels b: PByteArray; //used to easy the task of testing the byte pixels (R,G,B) ScanLinePtr: Pointer; //Pointer to current ScanLine being scanned ScanLineInc: Integer; //Offset to next bitmap scanline (can be negative) maxRects: Cardinal; //Number of rects to realloc memory by chunks of AllocUnit beginResult := 0;{Keep on hand lowest and highest values for the "transparent" pixels}lr :=GetRValue(TransparentColor);
lg :
=GetGValue(TransparentColor);
lb :
=GetBValue(TransparentColor);
hr :
= Min($FF, lr +RedTol);
hg :
= Min($FF, lg +GreenTol);
hb :
= Min($FF, lb +BlueTol);{ensures that the pixel format is 32-bits per pixel}bmp.PixelFormat :=pf32bit;{alloc initial region data}maxRects :=AllocUnit;
GetMem(RgnData, SizeOf(RGNDATAHEADER)
+ (SizeOf(TRect) *maxRects));try with RgnData^.rdh do begindwSize :=SizeOf(RGNDATAHEADER);
iType :
=RDH_RECTANGLES;
nCount :
= 0;
nRgnSize :
= 0;
SetRect(rcBound, MAXLONG, MAXLONG,
0, 0);end;{scan each bitmap row - the orientation doesn't matter (Bottom-up or not)}ScanLinePtr := bmp.ScanLine[0];
ScanLineInc :
= Integer(bmp.ScanLine[1]) -Integer(ScanLinePtr);for y := 0 to bmp.Height - 1 do beginx := 0;while x < bmp.Width do beginx0 :=x;while x < bmp.Width do beginb := @PByteArray(ScanLinePtr)[x *SizeOf(TRGBQuad)];//BGR-RGB: Windows 32bpp BMPs are made of BGRa quads (not RGBa) if (b[2] >= lr) and (b[2] <= hr) and(b[1] >= lg) and (b[1] <= hg) and(b[0] >= lb) and (b[0] <= hb) thenBreak;//pixel is transparent Inc(x);end;{test to see if we have a non-transparent area in the image} if x > x0 then begin {increase RgnData by AllocUnit rects if we exceeds maxRects} if RgnData^.rdh.nCount >= maxRects then beginInc(maxRects, AllocUnit);
ReallocMem(RgnData, SizeOf(RGNDATAHEADER)
+ (SizeOf(TRect) *MaxRects));end;{Add the rect (x0, y)-(x, y+1) as a new visible area in the region}pr := @RgnData^.Buffer; //Buffer is an array of rects with RgnData^.rdh do beginSetRect(pr[nCount], x0, y, x, y+ 1);{adjust the bound rectangle of the region if we are "out-of-bounds"} if x0 < rcBound.Left thenrcBound.Left :=x0;if y < rcBound.Top thenrcBound.Top :=y;if x > rcBound.Right thenrcBound.Right :=x;if y + 1 > rcBound.Bottom thenrcBound.Bottom := y + 1;
Inc(nCount);
end;end; //if x > x0 {Need to create the region by muliple calls to ExtCreateRegion, 'cause} {it will fail on Windows 98 if the number of rectangles is too large} if RgnData^.rdh.nCount = 2000 then beginh := ExtCreateRegion(nil, SizeOf(RGNDATAHEADER) + (SizeOf(TRect) *maxRects), RgnData^);if Result > 0 then begin //Expand the current region CombineRgn(Result, Result, h, RGN_OR);
DeleteObject(h);
end else //First region, assign it to Result Result :=h;
RgnData^.rdh.nCount :
= 0;
SetRect(RgnData^.rdh.rcBound, MAXLONG, MAXLONG,
0, 0);end;
Inc(x);
end; //scan every sample byte of the image Inc(Integer(ScanLinePtr), ScanLineInc);end;{need to call ExCreateRegion one more time because we could have left} {a RgnData with less than 2000 rects, so it wasn't yet created/combined}h := ExtCreateRegion(nil, SizeOf(RGNDATAHEADER) + (SizeOf(TRect) *MaxRects),
RgnData^);
if Result > 0 then beginCombineRgn(Result, Result, h, RGN_OR);
DeleteObject(h);
end elseResult :=h;finallyFreeMem(RgnData, SizeOf(RGNDATAHEADER)+ (SizeOf(TRect) *MaxRects));end;end;

I
've supplied a couple of simple examples of using this function for beginners: {This first example sets the region of a TForm} procedureTForm1.Button1Click(Sender: TObject);varARgn: HRGN;
ABitmap: TBitmap;
beginABitmap := TBitmap.Create;tryABitmap.LoadFromFile('C:\MyImage.bmp');
ARgn :
=BitmapToRegion(ABitmap, clFuchsia);
SetWindowRgn(Form1.Handle, ARgn, True);
finallyABitmap.Free;end;end;{This second example sets the region of a TPanel} procedureTForm1.Button1Click(Sender: TObject);varARgn: HRGN;
ABitmap: TBitmap;
beginABitmap := TBitmap.Create;tryABitmap.LoadFromFile('C:\MyImage.bmp');
ARgn :
=BitmapToRegion(ABitmap, clFuchsia);
SetWindowRgn(Panel1.Handle, ARgn, True);
finallyABitmap.Free;end;end;


链接:

https://blog.csdn.net/aikker/article/details/4050888

在开发界面及棋牌游戏过程中,需要很多镂空的图片,而且图片形式一般比较固定.
所以封装了几种常见的镂空方法.

1. 用于没有掩码图,只有指定透明色,不进行伸缩
void DrawTransBitmap( HDC hdcDest, // 目标DC
int nXOriginDest, // 目标X偏移
int nYOriginDest, // 目标Y偏移
int nWidthDest, // 目标宽度
int nHeightDest, // 目标高度
HDC hdcSrc, // 源DC
int nXOriginSrc, // 源X起点
int nYOriginSrc, // 源Y起点
COLORREF crTransparent // 透明色,COLORREF类型
);


2. 用于没有掩码图,只有指定透明色,可以进行伸缩
void DrawTransBitmap( HDC hdcDest, // 目标DC
int nXOriginDest, // 目标X偏移
int nYOriginDest, // 目标Y偏移
int nWidthDest, // 目标宽度
int nHeightDest, // 目标高度
HDC hdcSrc, // 源DC
int nXOriginSrc, // 源X起点
int nYOriginSrc, // 源Y起点
int nWidthSrc, // 源宽度
int nHeightSrc, // 源高度
COLORREF crTransparent // 透明色,COLORREF类型
);

3.指定掩码图,和掩码图属于不同图片
void DrawTransBitmap( HDC hdcDest, // 目标DC
int nXOriginDest, // 目标X偏移
int nYOriginDest, // 目标Y偏移
int nWidthDest, // 目标宽度
int nHeightDest, // 目标高度
HDC hdcSrc, // 源DC
HDC hdcMask, //掩码DC
int nXOriginSrc, // 源X起点
int nYOriginSrc, // 源Y起点
COLORREF crTransparent // 透明色,COLORREF类型
);

4.指定图片和掩码图同属于一张图片
void DrawTransBitmap(HDC hDC,
int nPosX,
int nPosY,
int nCX,
int nCY,
HBITMAP hObj
);

5.得到位图HRGN
HRGN CreateBitmapRgn(int nWidth,int nHeight,HBITMAP hbmp,COLORREF cTrans);

以下是完整代码
//用于没有掩码图,只有指定透明色,不进行伸缩
//方法一:

void DrawTransBitmap( HDC hdcDest,      //目标DC
                    int nXOriginDest,   //目标X偏移
                    int nYOriginDest,   //目标Y偏移
                    int nWidthDest,     //目标宽度
                    int nHeightDest,    //目标高度
                    HDC hdcSrc,         //源DC
                    int nXOriginSrc,    //源X起点
                    int nYOriginSrc,    //源Y起点
                    COLORREF crTransparent  //透明色,COLORREF类型
)
{
HBITMAP hOldImageBMP, hImageBMP
= CreateCompatibleBitmap(hdcDest, nWidthDest, nHeightDest); //创建兼容位图 HBITMAP hOldMaskBMP, hMaskBMP = CreateBitmap(nWidthDest, nHeightDest, 1, 1, NULL); //创建单色掩码位图 HDC hImageDC = CreateCompatibleDC(hdcDest);//临时DC HDC hMaskDC = CreateCompatibleDC(hdcDest);//临时掩码DC hOldImageBMP =(HBITMAP)SelectObject(hImageDC, hImageBMP);
hOldMaskBMP
=(HBITMAP)SelectObject(hMaskDC, hMaskBMP);//将源DC中的位图拷贝到临时DC中,源DC已经载入位图 BitBlt(hImageDC, 0, 0, nWidthDest, nHeightDest, hdcSrc, nXOriginSrc, nYOriginSrc, SRCCOPY);//设置临时DC的透明色 SetBkColor(hImageDC, crTransparent);//生成透明区域为白色,其它区域为黑色的临时掩码DC的掩码位图//位图来自临时DC BitBlt(hMaskDC, 0, 0, nWidthDest, nHeightDest, hImageDC, 0, 0, SRCCOPY);//生成透明区域为黑色,其它区域保持不变的位图 SetBkColor(hImageDC, RGB(0,0,0));
SetTextColor(hImageDC, RGB(
255,255,255));
BitBlt(hImageDC,
0, 0, nWidthDest, nHeightDest, hMaskDC, 0, 0, SRCAND);//透明部分保持屏幕不变,其它部分变成黑色 SetBkColor(hdcDest,RGB(255,255,255));
SetTextColor(hdcDest,RGB(
0,0,0));
BitBlt(hdcDest, nXOriginDest, nYOriginDest, nWidthDest, nHeightDest, hMaskDC,
0, 0, SRCAND);//"或"运算,生成最终效果 BitBlt(hdcDest, nXOriginDest, nYOriginDest, nWidthDest, nHeightDest, hImageDC, 0, 0, SRCPAINT);//清理、恢复 SelectObject(hImageDC, hOldImageBMP);
DeleteDC(hImageDC);
SelectObject(hMaskDC, hOldMaskBMP);
DeleteDC(hMaskDC);
DeleteObject(hImageBMP);
DeleteObject(hMaskBMP);
}

//用于没有掩码图,只有指定透明色,不进行伸缩
//方法二:

void DrawTransBitmap( HDC hdcDest,      //目标DC
                    int nXOriginDest,   //目标X偏移
                    int nYOriginDest,   //目标Y偏移
                    int nWidthDest,     //目标宽度
                    int nHeightDest,    //目标高度
                    HDC hdcSrc,         //源DC
                    int nXOriginSrc,    //源X起点
                    int nYOriginSrc,    //源Y起点
                    COLORREF crTransparent  //透明色,COLORREF类型
)
{
HBITMAP hOldImageBMP, hImageBMP
= CreateCompatibleBitmap(hdcDest, nWidthDest, nHeightDest); //创建兼容位图 HBITMAP hOldMaskBMP, hMaskBMP = CreateBitmap(nWidthDest, nHeightDest, 1, 1, NULL); //创建单色掩码位图 HDC hImageDC = CreateCompatibleDC(hdcDest);//临时DC HDC hMaskDC = CreateCompatibleDC(hdcDest);//临时掩码DC hOldImageBMP =(HBITMAP)SelectObject(hImageDC, hImageBMP);
hOldMaskBMP
=(HBITMAP)SelectObject(hMaskDC, hMaskBMP);//将源DC中的位图拷贝到临时DC中,源DC已经载入位图 BitBlt(hImageDC, 0, 0, nWidthDest, nHeightDest, hdcSrc, nXOriginSrc, nYOriginSrc, SRCCOPY);//设置临时DC的透明色 SetBkColor(hImageDC, crTransparent);//生成透明区域为白色,其它区域为黑色的临时掩码DC的掩码位图//位图来自临时DC BitBlt(hMaskDC, 0, 0, nWidthDest, nHeightDest, hImageDC, 0, 0, SRCCOPY);


BitBlt(hdcDest, nXOriginDest, nYOriginDest, nWidthDest, nHeightDest, hImageDC,
0, 0, SRCINVERT);

BitBlt(hdcDest, nXOriginDest, nYOriginDest, nWidthDest, nHeightDest, hMaskDC,
0, 0, SRCAND);

BitBlt(hdcDest, nXOriginDest, nYOriginDest, nWidthDest, nHeightDest, hImageDC,
0, 0, SRCINVERT);//清理、恢复 SelectObject(hImageDC, hOldImageBMP);
DeleteDC(hImageDC);
SelectObject(hMaskDC, hOldMaskBMP);
DeleteDC(hMaskDC);
DeleteObject(hImageBMP);
DeleteObject(hMaskBMP);
}

//用于没有掩码图,只有指定透明色,可以进行伸缩
//方法一:

void DrawTransBitmap( HDC hdcDest,      //目标DC
                     int nXOriginDest,   //目标X偏移
                     int nYOriginDest,   //目标Y偏移
                     int nWidthDest,     //目标宽度
                     int nHeightDest,    //目标高度
                     HDC hdcSrc,         //源DC
                     int nXOriginSrc,    //源X起点
                     int nYOriginSrc,    //源Y起点
                     int nWidthSrc,      //源宽度
                     int nHeightSrc,     //源高度
                     COLORREF crTransparent  //透明色,COLORREF类型
)
{
HBITMAP hOldImageBMP, hImageBMP
= CreateCompatibleBitmap(hdcDest, nWidthDest, nHeightDest); //创建兼容位图 HBITMAP hOldMaskBMP, hMaskBMP = CreateBitmap(nWidthDest, nHeightDest, 1, 1, NULL); //创建单色掩码位图 HDC hImageDC =CreateCompatibleDC(hdcDest);
HDC hMaskDC
=CreateCompatibleDC(hdcDest);
hOldImageBMP
=(HBITMAP)SelectObject(hImageDC, hImageBMP);
hOldMaskBMP
=(HBITMAP)SelectObject(hMaskDC, hMaskBMP);//将源DC中的位图拷贝到临时DC中 if (nWidthDest == nWidthSrc && nHeightDest ==nHeightSrc)
{
BitBlt(hImageDC,
0, 0, nWidthDest, nHeightDest, hdcSrc, nXOriginSrc, nYOriginSrc, SRCCOPY);
}
else{
StretchBlt(hImageDC,
0, 0, nWidthDest, nHeightDest,
hdcSrc, nXOriginSrc, nYOriginSrc, nWidthSrc, nHeightSrc, SRCCOPY);
}
//设置透明色 SetBkColor(hImageDC, crTransparent);//生成透明区域为白色,其它区域为黑色的掩码位图 BitBlt(hMaskDC, 0, 0, nWidthDest, nHeightDest, hImageDC, 0, 0, SRCCOPY);//生成透明区域为黑色,其它区域保持不变的位图 SetBkColor(hImageDC, RGB(0,0,0));
SetTextColor(hImageDC, RGB(
255,255,255));
BitBlt(hImageDC,
0, 0, nWidthDest, nHeightDest, hMaskDC, 0, 0, SRCAND);//透明部分保持屏幕不变,其它部分变成黑色 SetBkColor(hdcDest,RGB(0xff,0xff,0xff));
SetTextColor(hdcDest,RGB(
0,0,0));
BitBlt(hdcDest, nXOriginDest, nYOriginDest, nWidthDest, nHeightDest, hMaskDC,
0, 0, SRCAND);//"或"运算,生成最终效果 BitBlt(hdcDest, nXOriginDest, nYOriginDest, nWidthDest, nHeightDest, hImageDC, 0, 0, SRCPAINT);

SelectObject(hImageDC, hOldImageBMP);
DeleteDC(hImageDC);
SelectObject(hMaskDC, hOldMaskBMP);
DeleteDC(hMaskDC);
DeleteObject(hImageBMP);
DeleteObject(hMaskBMP);

}


//用于没有掩码图,只有指定透明色,可以进行伸缩
 //方法二:

void DrawTransBitmap( HDC hdcDest,      //目标DC
                     int nXOriginDest,   //目标X偏移
                     int nYOriginDest,   //目标Y偏移
                     int nWidthDest,     //目标宽度
                     int nHeightDest,    //目标高度
                     HDC hdcSrc,         //源DC
                     int nXOriginSrc,    //源X起点
                     int nYOriginSrc,    //源Y起点
                     int nWidthSrc,      //源宽度
                     int nHeightSrc,     //源高度
                     COLORREF crTransparent  //透明色,COLORREF类型
)
{
if (nWidthDest < 1) return false;if (nWidthSrc < 1) return false;if (nHeightDest < 1) return false;if (nHeightSrc < 1) return false;
HDC dc
=CreateCompatibleDC(NULL);
HBITMAP bitmap
= CreateBitmap(nWidthSrc, nHeightSrc, 1, GetDeviceCaps(dc,
BITSPIXEL), NULL);
if (bitmap ==NULL)
{
DeleteDC(dc);
return false;
}

HBITMAP oldBitmap
=(HBITMAP)SelectObject(dc, bitmap);if (!BitBlt(dc, 0, 0, nWidthSrc, nHeightSrc, dcSrc, nXOriginSrc,
nYOriginSrc, SRCCOPY))
{
SelectObject(dc, oldBitmap);
DeleteObject(bitmap);
DeleteDC(dc);
return false;
}

HDC maskDC
=CreateCompatibleDC(NULL);
HBITMAP maskBitmap
= CreateBitmap(nWidthSrc, nHeightSrc, 1, 1, NULL);if (maskBitmap ==NULL)
{
SelectObject(dc, oldBitmap);
DeleteObject(bitmap);
DeleteDC(dc);
DeleteDC(maskDC);
return false;
}
HBITMAP oldMask
=(HBITMAP)SelectObject(maskDC, maskBitmap);
SetBkColor(maskDC, RGB(
0,0,0));
SetTextColor(maskDC, RGB(
255,255,255));if (!BitBlt(maskDC, 0,0,nWidthSrc,nHeightSrc,NULL,0,0,BLACKNESS))
{
SelectObject(maskDC, oldMask);
DeleteObject(maskBitmap);
DeleteDC(maskDC);
SelectObject(dc, oldBitmap);
DeleteObject(bitmap);
DeleteDC(dc);
return false;
}
SetBkColor(dc, crTransparent);
BitBlt(maskDC,
0,0,nWidthSrc,nHeightSrc,dc,0,0,SRCINVERT);
SetBkColor(dc, RGB(
0,0,0));
SetTextColor(dc, RGB(
255,255,255));
BitBlt(dc,
0,0,nWidthSrc,nHeightSrc,maskDC,0,0,SRCAND);
HDC newMaskDC
=CreateCompatibleDC(NULL);
HBITMAP newMask;
newMask
= CreateBitmap(nWidthDest, nHeightDest, 1,
GetDeviceCaps(newMaskDC, BITSPIXEL), NULL);
if (newMask ==NULL)
{
SelectObject(dc, oldBitmap);
DeleteDC(dc);
SelectObject(maskDC, oldMask);
DeleteDC(maskDC);
DeleteDC(newMaskDC);
DeleteObject(bitmap);
DeleteObject(maskBitmap);
return false;
}
SetStretchBltMode(newMaskDC, COLORONCOLOR);
HBITMAP oldNewMask
=(HBITMAP) SelectObject(newMaskDC, newMask);
StretchBlt(newMaskDC,
0, 0, nWidthDest, nHeightDest, maskDC, 0, 0,
nWidthSrc, nHeightSrc, SRCCOPY);
SelectObject(maskDC, oldMask);
DeleteDC(maskDC);
DeleteObject(maskBitmap);
HDC newImageDC
=CreateCompatibleDC(NULL);
HBITMAP newImage
= CreateBitmap(nWidthDest, nHeightDest, 1,
GetDeviceCaps(newMaskDC, BITSPIXEL), NULL);
if (newImage ==NULL)
{
SelectObject(dc, oldBitmap);
DeleteDC(dc);
DeleteDC(newMaskDC);
DeleteObject(bitmap);
return false;
}
HBITMAP oldNewImage
=(HBITMAP)SelectObject(newImageDC, newImage);
StretchBlt(newImageDC,
0, 0, nWidthDest, nHeightDest, dc, 0, 0, nWidthSrc,
nHeightSrc, SRCCOPY);
SelectObject(dc, oldBitmap);
DeleteDC(dc);
DeleteObject(bitmap);
BitBlt( dcDest, nXOriginDest, nYOriginDest, nWidthDest, nHeightDest,
newMaskDC,
0, 0, SRCAND);
BitBlt( dcDest, nXOriginDest, nYOriginDest, nWidthDest, nHeightDest,
newImageDC,
0, 0, SRCPAINT);
SelectObject(newImageDC, oldNewImage);
DeleteDC(newImageDC);
SelectObject(newMaskDC, oldNewMask);
DeleteDC(newMaskDC);
DeleteObject(newImage);
DeleteObject(newMask);
return true;
}

指定掩码图,和掩码图属于不同图片

void DrawTransBitmap( HDC hdcDest,      //目标DC
                    int nXOriginDest,   //目标X偏移
                    int nYOriginDest,   //目标Y偏移
                    int nWidthDest,     //目标宽度
                    int nHeightDest,    //目标高度
                    HDC hdcSrc,         //源DC
HDC hdcMask,int nXOriginSrc,    //源X起点
                    int nYOriginSrc,    //源Y起点
                    COLORREF crTransparent  //透明色,COLORREF类型
)
{

HBITMAP hOldImageBMP, hImageBMP
= CreateCompatibleBitmap(hdcDest, nWidthDest, nHeightDest); //创建兼容位图 HDC hImageDC = CreateCompatibleDC(hdcDest);//临时DC hOldImageBMP =(HBITMAP)SelectObject(hImageDC, hImageBMP);//将源DC中的位图拷贝到临时DC中,源DC已经载入位图 BitBlt(hImageDC, 0, 0, nWidthDest, nHeightDest, hdcSrc, nXOriginSrc, nYOriginSrc, SRCCOPY);//设置临时DC的透明色 SetBkColor(hImageDC, crTransparent);//生成透明区域为黑色,其它区域保持不变的位图 SetBkColor(hImageDC, RGB(0,0,0));
SetTextColor(hImageDC, RGB(
255,255,255));
BitBlt(hImageDC,
0, 0, nWidthDest, nHeightDest, hdcMask, 0, 0, SRCAND);//透明部分保持屏幕不变,其它部分变成黑色 SetBkColor(hdcDest,RGB(255,255,255));
SetTextColor(hdcDest,RGB(
0,0,0));
BitBlt(hdcDest, nXOriginDest, nYOriginDest, nWidthDest, nHeightDest, hdcMask,
0, 0, SRCAND);//"或"运算,生成最终效果 BitBlt(hdcDest, nXOriginDest, nYOriginDest, nWidthDest, nHeightDest, hImageDC, 0, 0, SRCPAINT);//清理、恢复 SelectObject(hImageDC, hOldImageBMP);
DeleteDC(hImageDC);
DeleteObject(hImageBMP);
}
//指定图片和掩码图同属于一张图片 void DrawTransBitmap(HDC hDC, int nPosX, int nPosY, int nCX, intnCY, HBITMAP hObj)
{
HDC hMemDC
=CreateCompatibleDC(hDC);
HBITMAP hOldBMP
=(HBITMAP)::SelectObject(hMemDC,hObj);
BitBlt(hDC,nPosX,nPosY,nCX,nCY, hMemDC,nCX,
0,SRCAND);
BitBlt(hDC,nPosX,nPosY,nCX,nCY, hMemDC,
0,0,SRCPAINT);
SelectObject(hMemDC,hOldBMP);
DeleteDC(hMemDC);

}

HRGN CreateBitmapRgn(
int nWidth,intnHeight,HBITMAP hbmp, COLORREF TransColor)
{
HDC hmemDC;
//创建与传入DC兼容的临时DC hmemDC =::CreateCompatibleDC(NULL);
HBITMAP hOldBmp
=(HBITMAP)::SelectObject(hmemDC,hbmp);//创建总的窗体区域,初始region为0 HRGN hrgn;
hrgn
= ::CreateRectRgn(0,0,0,0);inty;for(y=0;y<nHeight ;y++)
{
HRGN rgnTemp;
//保存临时region int iX = 0;do{//跳过透明色找到下一个非透明色的点. while (iX < nWidth && ::GetPixel(hmemDC,iX, y) ==TransColor)
iX
++;//记住这个起始点 int iLeftX =iX;//寻找下个透明色的点 while (iX < nWidth && ::GetPixel(hmemDC,iX, y) !=TransColor)++iX;//创建一个包含起点与重点间高为1像素的临时“region” rgnTemp=::CreateRectRgn(iLeftX, y, iX, y+1);//合并到主"region". CombineRgn( hrgn,hrgn,rgnTemp, RGN_OR);//删除临时"region",否则下次创建时和出错 ::DeleteObject(rgnTemp);
}
while(iX <nWidth );
iX
= 0;
}
::SelectObject(hmemDC,hOldBmp);
::DeleteDC(hmemDC);
returnhrgn;
}